
“Soft, fluffy and moist homemade Cinnamon swirl bread, so likeable by everyone!”
Break making is easy. You don’t require master’s skills to have a freshly baked loaf at home.
I read a few blogs about making cinnamon bread. So, I tried baking it on my own, too. I baked both the sweet cinnamon rolls as well as cinnamon swirl loaf, just to test which way yields better textured bread.
The result is varied depends on your liking and serving occasion. For me, I loved the swirl loaf as it was overall softer even the top crust, while it will be more presentable to have it made into small rolls, for serving guests and as gift to friends.
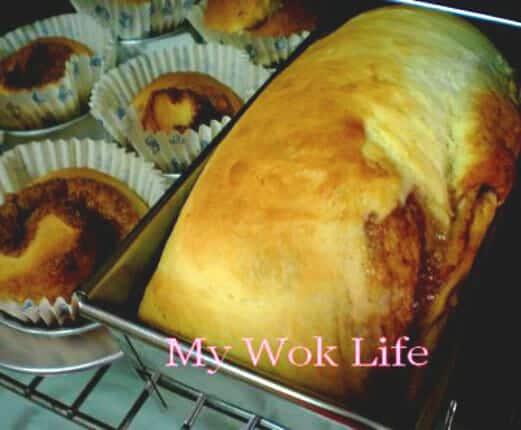
Yes, the loaf was soft and moist. I loved this texture as it made the biting more chewy and smooth in the palate. It was neither dense nor dry.
However, as each mini roll was baked individually, the baking temperature has to be slightly lower than baking an entire loaf.
Unlike loaf bread, mini rolls are best to consumed within an hour freshly out from the oven. Otherwise, the top part/ surface of the rolls will be slightly dense after a while, even though it was still cottony soft inside. See, it was as if tearing a cotton wool. Yummy..

Maybe the denseness has to do with thickness of the rolls (my rolls were a little too thick as it should be thinner layer with more swirls, if I have flatten the dough enough to roll it up more rounds instead), and its baking temperature. By right, temperature for baking small cinnamon rolls should be 160°C, and cinnamon roll at 170°C – 180°C. I wanted to try out which type is better, and yet, wished to save time (just lazy), I baked them at one go.
Well, they turned out pretty well, even though the rolls could be softer on its top part. Ok, ok, I should bake only one type at a time with the most accurate temperature, for the best result next time round.
Nonetheless, both ways, the cinnamon bread was still fantastic!
I know, the baking steps may look deceptively complicated and lengthy, but in fact, it is not so! I think it’s easier than baking a cake, to me. Smile.
Baking bread is not a hard chore. Success rate of making the soft, nice bread is relatively high.
 Just that the dough-kneading step might be dreadful. After all, it’s total of an hour of kneading! But to me, it was not an issue. I used my left hand to do the kneading, and I was motivated. Why? Because I took it as a form of work-out for my ‘rarely exercise’ left hand, especially the arm. Laughing!
Use either your lower palm, or knuckles (not fist) to do the kneading. I think using knuckles is more effective. Or, do an exchange of ways, or even hands from time to time, over the few kneading periods. Yes, that was how I knead it, first used the palm, then the knuckles. (winking smile).
I am so happy to have my 1st bread successfully baked with terrific taste! I wish to share with you guys.
Let’s see:
Ingredients
Dough:
200 gram of bread flour, sieved
50 gram of white sugar
5 gram of yeast (about 1- 1.5 teaspoon)
¼ teaspoon of salt
100 gram of whipping cream
40 gram of fresh or skimmed milk (I used low-fat skimmed milk)
1 large egg yolk
15 gram of butter, softened at room temperature (about 1 tablespoon)
Filling:
½ teaspoon of ground cinnamon
1.5 – 2 tablespoons of brown sugar
20 gram of semi-soft butter, cut into 12 – 15 thin stripes
Utensil:
Large mixing bowl
Wire Whisk
Small/ medium paper cups/ 3 x 8” loaf pan or slightly larger
Method:
1) Sieve bread flour, mix flour, sugar, yeast and salt in a large mixing bowl. Combine well.
2) In separate bowl, mix in milk, whipping cream and yolk.
3) Make a well in the center of the flour mixture, and pour in milk solution. Stir with wire whisk to combine all ingredients.
4) When the mixture has become thick and lumpy, get rid of the wire whisk, use your clean bare hand to knead it until it forms dough.
5) Dough will be sticky and rough initially, but it will become smooth after 15 minute of kneading. It’s OK if it does not stick to the bowl/ kneading board, but still appear very sticky on your hand. It will be OK after mixing in butter.
 6) Yes, after 15-minute of kneading, rub in butter (bit by bit) till the entire dough is fully incorporated. Dough should appear smooth and a little dampness. Continue kneading the dough for 30 minutes.
7) Now, dough should appear smooth and flawless. It will not be sticky on both the bowl and your hand. Dough should be the texture of your earlobe. Check if dough is kneaded enough by pulling a little of it, the right textured dough should be elastic and not too easily tear.
8) Put dough in a large slightly greased (with butter or olive oil) pan, and cover with cling wrap. Let it rise in a warm place for 1 – 1.5 hour long. Dough should be doubled in size by the time it’s finished.
 9) Punch the dough down to deflate. Then, divide it into 2 parts. Let it rise again in the pans (covered), for another 20 minute.
10) In the meantime, let’s prepare the filling. Simply mix ground cinnamon and brown sugar well. Reserve for later.
11) When the rise is done, roll each part of dough into flat rectangular sheets. Sprinkle generous amount of cinnamon mixture evenly on the entire sheet of each dough. Then, place thin strips of butter each with 1 inch apart in a row.
12) Then, roll it up.
For tiny cinnamon rolls: Divide the roll into 1.5 – 2 inches wide each, lengthwise. Place each tiny roll on its side facing upwards, in medium sized paper cookie cup.
For swirl loaf: Simply fold down both ends, and place the entire roll into a slightly greased loaf pan.
13) When both completed rolls are nicely place. Leave them aside, covered with cling wrap, for 15 minutes.
14) At the same time, just preheat oven (top and bottom heat) to 170°C, for 15 minutes. Place the loaf pan(s) into the oven, bake them for 20 minutes.
15) After 20-minute bake, top crust of the loaves/rolls should be lightly browned. Pull the loaves/ rolls out, and let them cool for 15 – 20 minutes, before slicing the loaf, or serving the rolls.
Yes, done! Easy? Uhhmmm…. I think it was fun! The fragrance of these sweet cinnamon loaves and rolls were irresistible You can smell the fragrance of bread even when doing the knead. After only 15 minutes of baking, the fragrance of the bread which emerges with sweet cinnamon flavour will make your drool instantly!
Tips: Knead the dough, and not throwing it against the kitchen table top or the mixing bowl!
* Flatten the dough to thinner sheets to create more swirls for better presentation, as desired. Mine was too thick and less swirls of each roll.
* Dough of making mini roll should not be cut too big for each paper cup, remember to leave some space in the cup for expansion when baked. But I guess my paper cup was too big for a tiny roll (Laughing). Use of small cup is recommended.
* Use the whipping cream directly poured from its package, need not to whip it. I used whipping cream of Emborg Brand or whip topping cream of Red Man Brand.
What do you mean by using whipping cream without whipped ? Thanks
Hi,
Use the cream directly poured from the package, need not to whip it.
You know, I was afraid some might think have to whip/beat till foamy/creamy form before using to bake this bread.
Just a precaution. Perhap, I was misleading in my statement. Hope I have solved your question. :)
Hi Pat
I finally try this on Sat after deliberating for weeks…cos’ of the lengthy procedure and kneading. But the end result was good :) It tasted like the rolls in the once popular ‘Saint Cinammon’!! It was really tasty and fragrant. But one thing, this roll has to be eaten fresh as it will turn hard the next day. I tried making a bread loaf on Sun and instead of one whole loaf, I shaped it into 9 small buns…with cinammon and sugar. Wow, the end result was fluffy and soft bun. My husband even complimented that the buns tasted like those in bakery shop:))
Thanks Pat for the recipe. It was indeed a good experience making bread….and I tell you, it is really a good form of excercise for the arms kneading the dough….really aching, but I find my arms more firm now(maybe self-imagination)*lol*
Hey Buttercup,
I am so happy that you shared your cooking/ baking experience with me!
Hmm… Bread was harden the next day? It didn’t happen to mine.. Maybe, it was due to the size of bread, making into smaller bun might be easily harden, but to my experience, it will happen only on the surface/ outer layer of the small bun. Inside of the bun should remain soft and fluffy.. Did you cover your bread with tightly? You have to seal your remaining bread air-tightly. :)
Or, try making in loaf and the ‘hardening’ problem may be solved. The loaf I have made remained soft for days, in fact..
Haha… felt good after the ‘exercise’ right?? I had the same feeling, too! Do it weekly or fortnightly, and your arm will be very firm, for sure! :D
Hi Pat
It was the mini rolls that turns hard on the surface the next day, but they were still soft inside. As for the small buns, they remained soft even after 2 days…..really nice. Btw, I have tried out your banana cake recipe. Wow, really very good. The cake was really moist and fragrant :)
Hey Buttercup,
Thanks for your constant patronage..
Friend, I really am flattering by all your good comments..Actually, my cookings/ bakings were all meant for home consumption for my family. Hence, I will try my best to cook it delicious.. And I want you guys to have the same feeling of happiness in food, too.. So, clear & good recipes with after taste experience are what I will share.. I really hope to keep up with the good work for long term..
Anyway, really appreciate your feedback, you motivate me! Really touched.. :D
any substitute for the whipping cream?
Heavy cream? Yogurt? Greek yogurt? These are what I think will work. :)